budva-paragliding.me
Budva route kiezen Vergelijk Budva-routes
Home Routes Eerste keer FAQ Reviews Contact
Budva route kiezen Vergelijk Budva-routes
Home Routes Eerste keer FAQ Reviews Contact
Fotogalerij

Gebruik fotokaarten om routezicht en plek bij Budva Paragliding te vergelijken.

Foto is de langzamere galerijroute: makkelijker om kustlijn, stadscontext, Old Town, Sveti Stefan en route-fit naast elkaar te leggen.

  • Meer duidelijkheid
  • Budva-gericht
  • Beslishulp
Bekijk videokaarten
Budva Paragliding Fotogalerij
i
Budva vanuit de lucht: warme kust, open hemel en een kalm tandemperspectief. Een echt paraglidingmoment tussen zeelicht en hoogte. Budva-kust vanuit een tandemvleugel.

Waar deze pagina je mee helpt

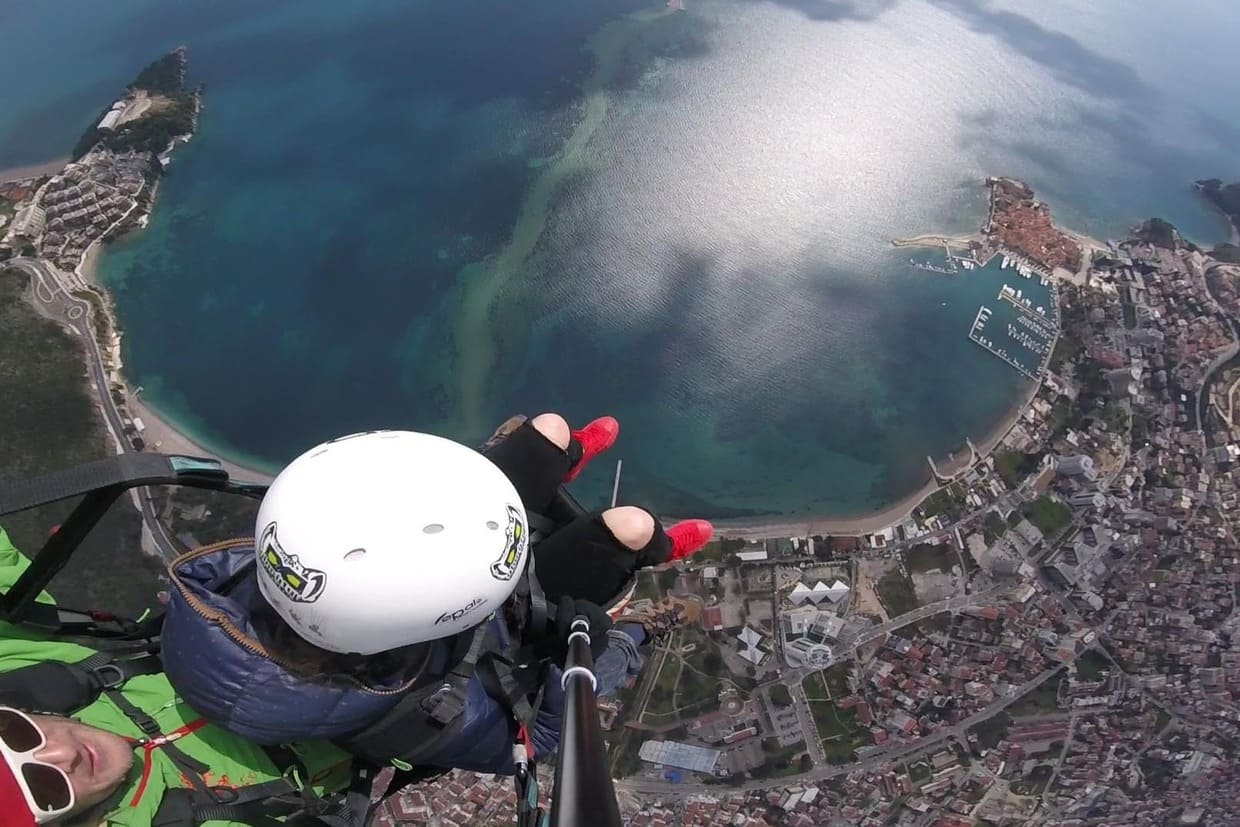
Foto maakt plek- en routeverschil duidelijker dan een lange lijst met claims.

Bijschriften houden elk beeld verbonden met Budva als stadsknooppunt.

De fotoroute leidt terug naar routevergelijk of oriëntatie voor eerste vlucht.

Zo gebruik je deze pagina

Wat laat de fotogalerij zien?

Budva-kust, stadscontext, brede routezichten, Old Town, Sveti Stefan en genoeg houvast voor routekeuze.

Handige volgende stap Video kiezen als beweging en gevoel belangrijker zijn dan stilstaande routevergelijking.

Fotokaarten

De galerij gebruikt de gesorteerde Budva-fotoset als visuele ondersteuning. Routenamen helpen oriënteren; de volgende praktische stap blijft routevergelijking in plaats van een algemeen beeldarchief.

Landing context photo 1 Landing context for understanding how the flight returns to the coast.
Landing context photo 2 Landing context for understanding how the flight returns to the coast.
Budva Old Town photo 1 Old Town context for people who want Budva itself to remain visible in the memory.
Budva Old Town photo 2 Old Town context for people who want Budva itself to remain visible in the memory.
Budva Old Town photo 3 Old Town context for people who want Budva itself to remain visible in the memory.
Budva Old Town photo 4 Old Town context for people who want Budva itself to remain visible in the memory.
Budva Old Town photo 5 Old Town context for people who want Budva itself to remain visible in the memory.
Budva Old Town photo 6 Old Town context for people who want Budva itself to remain visible in the memory.
Budva Old Town photo 7 Old Town context for people who want Budva itself to remain visible in the memory.
Budva Old Town photo 8 Old Town context for people who want Budva itself to remain visible in the memory.
Budva Old Town photo 9 Old Town context for people who want Budva itself to remain visible in the memory.
Budva Old Town photo 10 Old Town context for people who want Budva itself to remain visible in the memory.
Budva Old Town photo 11 Old Town context for people who want Budva itself to remain visible in the memory.
Budva Old Town photo 12 Old Town context for people who want Budva itself to remain visible in the memory.
Budva Old Town photo 13 Old Town context for people who want Budva itself to remain visible in the memory.
Budva Old Town photo 14 Old Town context for people who want Budva itself to remain visible in the memory.
Budva Old Town photo 15 Old Town context for people who want Budva itself to remain visible in the memory.
Budva Old Town photo 16 Old Town context for people who want Budva itself to remain visible in the memory.
Budva Old Town photo 17 Old Town context for people who want Budva itself to remain visible in the memory.
Budva Riviera photo 1 A wider Budva Riviera view for comparing coastline scale and panorama.
Budva Riviera photo 2 A wider Budva Riviera view for comparing coastline scale and panorama.
Budva Riviera photo 3 A wider Budva Riviera view for comparing coastline scale and panorama.
Budva Riviera photo 4 A wider Budva Riviera view for comparing coastline scale and panorama.
Budva Riviera photo 5 A wider Budva Riviera view for comparing coastline scale and panorama.
Budva Riviera photo 6 A wider Budva Riviera view for comparing coastline scale and panorama.
Budva Riviera photo 7 A wider Budva Riviera view for comparing coastline scale and panorama.
Budva Riviera photo 8 A wider Budva Riviera view for comparing coastline scale and panorama.
Budva Riviera photo 9 A wider Budva Riviera view for comparing coastline scale and panorama.
Budva Riviera photo 10 A wider Budva Riviera view for comparing coastline scale and panorama.
Budva Riviera photo 11 A wider Budva Riviera view for comparing coastline scale and panorama.
Budva Riviera photo 12 A wider Budva Riviera view for comparing coastline scale and panorama.
Budva Riviera photo 13 A wider Budva Riviera view for comparing coastline scale and panorama.
Budva Riviera photo 14 A wider Budva Riviera view for comparing coastline scale and panorama.
Budva Riviera photo 15 A wider Budva Riviera view for comparing coastline scale and panorama.
Budva Riviera photo 16 A wider Budva Riviera view for comparing coastline scale and panorama.
Budva Riviera photo 17 A wider Budva Riviera view for comparing coastline scale and panorama.
Budva Riviera photo 18 A wider Budva Riviera view for comparing coastline scale and panorama.
Budva Riviera photo 19 A wider Budva Riviera view for comparing coastline scale and panorama.
Budva Riviera photo 20 A wider Budva Riviera view for comparing coastline scale and panorama.
Budva Riviera photo 21 A wider Budva Riviera view for comparing coastline scale and panorama.
Budva Standard photo 1 A practical Budva Standard visual: broad coast, simple route context, and the default flight feeling.
Budva Standard photo 2 A practical Budva Standard visual: broad coast, simple route context, and the default flight feeling.
Budva Standard photo 3 A practical Budva Standard visual: broad coast, simple route context, and the default flight feeling.
Budva Standard photo 4 A practical Budva Standard visual: broad coast, simple route context, and the default flight feeling.
Budva Standard photo 5 A practical Budva Standard visual: broad coast, simple route context, and the default flight feeling.
Budva Standard photo 6 A practical Budva Standard visual: broad coast, simple route context, and the default flight feeling.
Budva Standard photo 7 A practical Budva Standard visual: broad coast, simple route context, and the default flight feeling.
Budva Standard photo 8 A practical Budva Standard visual: broad coast, simple route context, and the default flight feeling.
Budva Standard photo 9 A practical Budva Standard visual: broad coast, simple route context, and the default flight feeling.
Budva Standard photo 10 A practical Budva Standard visual: broad coast, simple route context, and the default flight feeling.
Budva Standard photo 11 A practical Budva Standard visual: broad coast, simple route context, and the default flight feeling.
Budva Standard photo 12 A practical Budva Standard visual: broad coast, simple route context, and the default flight feeling.
Budva Standard photo 13 A practical Budva Standard visual: broad coast, simple route context, and the default flight feeling.
Budva Standard photo 14 A practical Budva Standard visual: broad coast, simple route context, and the default flight feeling.
Budva Standard photo 15 A practical Budva Standard visual: broad coast, simple route context, and the default flight feeling.
Budva Standard photo 16 A practical Budva Standard visual: broad coast, simple route context, and the default flight feeling.
Budva Standard photo 17 A practical Budva Standard visual: broad coast, simple route context, and the default flight feeling.
Budva Standard photo 18 A practical Budva Standard visual: broad coast, simple route context, and the default flight feeling.
Budva Standard photo 19 A practical Budva Standard visual: broad coast, simple route context, and the default flight feeling.
Budva Standard photo 20 A practical Budva Standard visual: broad coast, simple route context, and the default flight feeling.
Budva Standard photo 21 A practical Budva Standard visual: broad coast, simple route context, and the default flight feeling.
Budva Standard photo 22 A practical Budva Standard visual: broad coast, simple route context, and the default flight feeling.
Budva Standard photo 23 A practical Budva Standard visual: broad coast, simple route context, and the default flight feeling.
Budva Standard photo 24 A practical Budva Standard visual: broad coast, simple route context, and the default flight feeling.
Budva Standard photo 25 A practical Budva Standard visual: broad coast, simple route context, and the default flight feeling.
Budva Standard photo 26 A practical Budva Standard visual: broad coast, simple route context, and the default flight feeling.
Budva Standard photo 27 A practical Budva Standard visual: broad coast, simple route context, and the default flight feeling.
Budva Standard photo 28 A practical Budva Standard visual: broad coast, simple route context, and the default flight feeling.
Budva Standard photo 29 A practical Budva Standard visual: broad coast, simple route context, and the default flight feeling.
Budva Standard photo 30 A practical Budva Standard visual: broad coast, simple route context, and the default flight feeling.
Budva Standard photo 31 A practical Budva Standard visual: broad coast, simple route context, and the default flight feeling.
Budva Standard photo 32 A practical Budva Standard visual: broad coast, simple route context, and the default flight feeling.
Budva Standard photo 33 A practical Budva Standard visual: broad coast, simple route context, and the default flight feeling.
Budva Standard photo 34 A practical Budva Standard visual: broad coast, simple route context, and the default flight feeling.
Budva Standard photo 35 A practical Budva Standard visual: broad coast, simple route context, and the default flight feeling.
Budva Standard photo 36 A practical Budva Standard visual: broad coast, simple route context, and the default flight feeling.
Budva Standard photo 37 A practical Budva Standard visual: broad coast, simple route context, and the default flight feeling.
Budva Standard photo 38 A practical Budva Standard visual: broad coast, simple route context, and the default flight feeling.
Budva Standard photo 39 A practical Budva Standard visual: broad coast, simple route context, and the default flight feeling.
Budva Standard photo 40 A practical Budva Standard visual: broad coast, simple route context, and the default flight feeling.
Budva Standard photo 41 A practical Budva Standard visual: broad coast, simple route context, and the default flight feeling.
Budva Standard photo 42 A practical Budva Standard visual: broad coast, simple route context, and the default flight feeling.
Budva Standard photo 43 A practical Budva Standard visual: broad coast, simple route context, and the default flight feeling.
Budva Standard photo 44 A practical Budva Standard visual: broad coast, simple route context, and the default flight feeling.
Budva Standard photo 45 A practical Budva Standard visual: broad coast, simple route context, and the default flight feeling.
Budva Standard photo 46 A practical Budva Standard visual: broad coast, simple route context, and the default flight feeling.
Budva Standard photo 47 A practical Budva Standard visual: broad coast, simple route context, and the default flight feeling.
Budva Standard photo 48 A practical Budva Standard visual: broad coast, simple route context, and the default flight feeling.
Budva Standard photo 49 A practical Budva Standard visual: broad coast, simple route context, and the default flight feeling.
Budva Standard photo 50 A practical Budva Standard visual: broad coast, simple route context, and the default flight feeling.
Sveti Stefan photo 1 Sveti Stefan route context: useful when the island view is the reason for a more specific route.
Sveti Stefan photo 2 Sveti Stefan route context: useful when the island view is the reason for a more specific route.
Sveti Stefan photo 3 Sveti Stefan route context: useful when the island view is the reason for a more specific route.
Sveti Stefan photo 4 Sveti Stefan route context: useful when the island view is the reason for a more specific route.
Sveti Stefan photo 5 Sveti Stefan route context: useful when the island view is the reason for a more specific route.
Sveti Stefan photo 6 Sveti Stefan route context: useful when the island view is the reason for a more specific route.
Sveti Stefan photo 7 Sveti Stefan route context: useful when the island view is the reason for a more specific route.
Sveti Stefan photo 8 Sveti Stefan route context: useful when the island view is the reason for a more specific route.
Sveti Stefan photo 9 Sveti Stefan route context: useful when the island view is the reason for a more specific route.
Sveti Stefan photo 10 Sveti Stefan route context: useful when the island view is the reason for a more specific route.
Sveti Stefan photo 11 Sveti Stefan route context: useful when the island view is the reason for a more specific route.
Sveti Stefan photo 12 Sveti Stefan route context: useful when the island view is the reason for a more specific route.
Sveti Stefan photo 13 Sveti Stefan route context: useful when the island view is the reason for a more specific route.
Sveti Stefan photo 14 Sveti Stefan route context: useful when the island view is the reason for a more specific route.
Sveti Stefan photo 15 Sveti Stefan route context: useful when the island view is the reason for a more specific route.
Sveti Stefan photo 16 Sveti Stefan route context: useful when the island view is the reason for a more specific route.
Sveti Stefan photo 17 Sveti Stefan route context: useful when the island view is the reason for a more specific route.
Sveti Stefan photo 18 Sveti Stefan route context: useful when the island view is the reason for a more specific route.
Sveti Stefan photo 19 Sveti Stefan route context: useful when the island view is the reason for a more specific route.
Sveti Stefan photo 20 Sveti Stefan route context: useful when the island view is the reason for a more specific route.
Sveti Stefan photo 21 Sveti Stefan route context: useful when the island view is the reason for a more specific route.
Sveti Stefan photo 22 Sveti Stefan route context: useful when the island view is the reason for a more specific route.
Sveti Stefan photo 23 Sveti Stefan route context: useful when the island view is the reason for a more specific route.
Sveti Stefan photo 24 Sveti Stefan route context: useful when the island view is the reason for a more specific route.
Sveti Stefan photo 25 Sveti Stefan route context: useful when the island view is the reason for a more specific route.
Sveti Stefan photo 26 Sveti Stefan route context: useful when the island view is the reason for a more specific route.
Sveti Stefan photo 27 Sveti Stefan route context: useful when the island view is the reason for a more specific route.
Sveti Stefan photo 28 Sveti Stefan route context: useful when the island view is the reason for a more specific route.
Takeoff context Takeoff context for understanding the start of the tandem flight.
Budva overview Budva overview context for the gallery support layer.

Houd de fotoroute praktisch

Gebruik de beelden om Budva Standard, Riviera, Old Town, Sveti Stefan plus start- en landingscontext te vergelijken. Als een bezoeker al weet welk zicht telt, stuur terug naar de Budva-routepagina's.

Volgende galerijroute

Gebruik video als je beweging en vlucht ritme wilt zien.

Foto helpt bij routevergelijking. Video helpt bij beweging, ritme bij start en algemeen vluchtgevoel.

Bekijk videokaartenBudva-routes vergelijken

budva-paragliding.me

Budva-gerichte tandemparaglidingoriëntatie met duidelijke routes, praktische stappen en lokale details.

Begin hier

Budva start Budva-routes Eerste keer Galerij

Voor je bericht

FAQ Reviews Contact Cadeaubon

Meer Budva-antwoorden

Hoe paragliden past bij een verblijf in Budva Budva Standard route Wat te doen na paragliden in Budva Budva of Becici voor paragliden?
Language:
🇳🇱
🇬🇧 🇩🇪 🇲🇪 🇳🇱 Русский