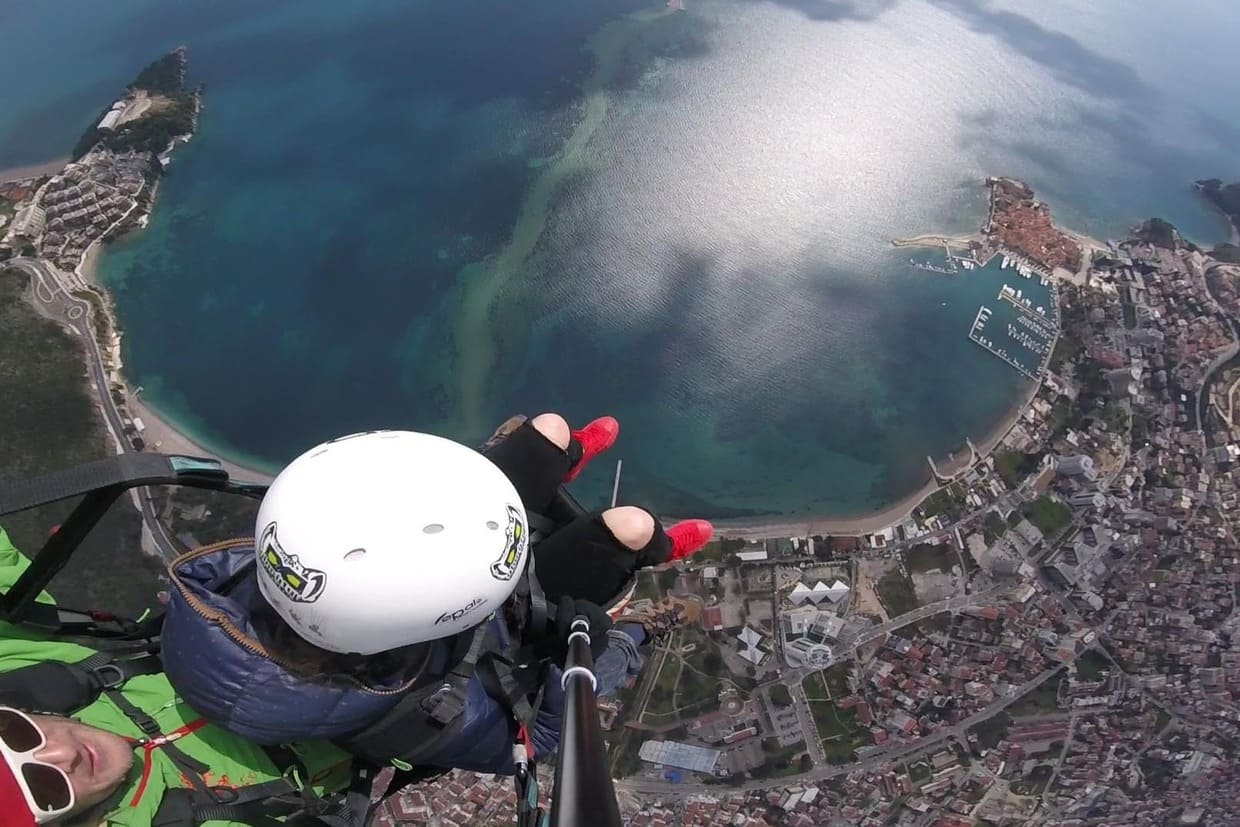
budva-paragliding.me
Plan your Budva flight See Paragliding Options
Home Flights First Flight FAQ Reviews Contact
Plan your Budva flight See Paragliding Options
Home Flights First Flight FAQ Reviews Contact
Photo gallery

Use photo cards to compare Budva Paragliding route views and place context.

Photos are the slower gallery route: they make it easier to compare the coastline, town-base context, Old Town, Sveti Stefan, and route fit.

  • Practical choice
  • Budva routes
  • Clear next step
Watch video cards
Budva Paragliding Photo Gallery
i
Budva from the air: warm coastline, open sky, and a calm tandem point of view. A real paragliding moment where sea light meets altitude. Budva coastline from a tandem wing.

What matters here

Photos clarify place and route differences better than a long list of claims.

Captions keep each image tied to Budva's town-base role.

The photo route should lead back to route comparison or first-flight guidance.

Short answer before you ask

What should the photo gallery show?

Budva coast, town context, broad route views, Old Town, Sveti Stefan, and enough practical grounding to support route choice.

Useful next step Use videos when you want movement and flight feeling instead of still route comparison.

Photo cards

The gallery uses the new sorted Budva photo set. Keep it as a visual support layer: route names help orientation, but the next practical step should still be route comparison rather than turning this page into a general image archive.

Landing context photo 1 Landing context for understanding how the flight returns to the coast.
Landing context photo 2 Landing context for understanding how the flight returns to the coast.
Budva Old Town photo 1 Old Town context for people who want Budva itself to remain visible in the memory.
Budva Old Town photo 2 Old Town context for people who want Budva itself to remain visible in the memory.
Budva Old Town photo 3 Old Town context for people who want Budva itself to remain visible in the memory.
Budva Old Town photo 4 Old Town context for people who want Budva itself to remain visible in the memory.
Budva Old Town photo 5 Old Town context for people who want Budva itself to remain visible in the memory.
Budva Old Town photo 6 Old Town context for people who want Budva itself to remain visible in the memory.
Budva Old Town photo 7 Old Town context for people who want Budva itself to remain visible in the memory.
Budva Old Town photo 8 Old Town context for people who want Budva itself to remain visible in the memory.
Budva Old Town photo 9 Old Town context for people who want Budva itself to remain visible in the memory.
Budva Old Town photo 10 Old Town context for people who want Budva itself to remain visible in the memory.
Budva Old Town photo 11 Old Town context for people who want Budva itself to remain visible in the memory.
Budva Old Town photo 12 Old Town context for people who want Budva itself to remain visible in the memory.
Budva Old Town photo 13 Old Town context for people who want Budva itself to remain visible in the memory.
Budva Old Town photo 14 Old Town context for people who want Budva itself to remain visible in the memory.
Budva Old Town photo 15 Old Town context for people who want Budva itself to remain visible in the memory.
Budva Old Town photo 16 Old Town context for people who want Budva itself to remain visible in the memory.
Budva Old Town photo 17 Old Town context for people who want Budva itself to remain visible in the memory.
Budva Riviera photo 1 A wider Budva Riviera view for comparing coastline scale and panorama.
Budva Riviera photo 2 A wider Budva Riviera view for comparing coastline scale and panorama.
Budva Riviera photo 3 A wider Budva Riviera view for comparing coastline scale and panorama.
Budva Riviera photo 4 A wider Budva Riviera view for comparing coastline scale and panorama.
Budva Riviera photo 5 A wider Budva Riviera view for comparing coastline scale and panorama.
Budva Riviera photo 6 A wider Budva Riviera view for comparing coastline scale and panorama.
Budva Riviera photo 7 A wider Budva Riviera view for comparing coastline scale and panorama.
Budva Riviera photo 8 A wider Budva Riviera view for comparing coastline scale and panorama.
Budva Riviera photo 9 A wider Budva Riviera view for comparing coastline scale and panorama.
Budva Riviera photo 10 A wider Budva Riviera view for comparing coastline scale and panorama.
Budva Riviera photo 11 A wider Budva Riviera view for comparing coastline scale and panorama.
Budva Riviera photo 12 A wider Budva Riviera view for comparing coastline scale and panorama.
Budva Riviera photo 13 A wider Budva Riviera view for comparing coastline scale and panorama.
Budva Riviera photo 14 A wider Budva Riviera view for comparing coastline scale and panorama.
Budva Riviera photo 15 A wider Budva Riviera view for comparing coastline scale and panorama.
Budva Riviera photo 16 A wider Budva Riviera view for comparing coastline scale and panorama.
Budva Riviera photo 17 A wider Budva Riviera view for comparing coastline scale and panorama.
Budva Riviera photo 18 A wider Budva Riviera view for comparing coastline scale and panorama.
Budva Riviera photo 19 A wider Budva Riviera view for comparing coastline scale and panorama.
Budva Riviera photo 20 A wider Budva Riviera view for comparing coastline scale and panorama.
Budva Riviera photo 21 A wider Budva Riviera view for comparing coastline scale and panorama.
Budva Standard photo 1 A practical Budva Standard visual: broad coast, simple route context, and the default flight feeling.
Budva Standard photo 2 A practical Budva Standard visual: broad coast, simple route context, and the default flight feeling.
Budva Standard photo 3 A practical Budva Standard visual: broad coast, simple route context, and the default flight feeling.
Budva Standard photo 4 A practical Budva Standard visual: broad coast, simple route context, and the default flight feeling.
Budva Standard photo 5 A practical Budva Standard visual: broad coast, simple route context, and the default flight feeling.
Budva Standard photo 6 A practical Budva Standard visual: broad coast, simple route context, and the default flight feeling.
Budva Standard photo 7 A practical Budva Standard visual: broad coast, simple route context, and the default flight feeling.
Budva Standard photo 8 A practical Budva Standard visual: broad coast, simple route context, and the default flight feeling.
Budva Standard photo 9 A practical Budva Standard visual: broad coast, simple route context, and the default flight feeling.
Budva Standard photo 10 A practical Budva Standard visual: broad coast, simple route context, and the default flight feeling.
Budva Standard photo 11 A practical Budva Standard visual: broad coast, simple route context, and the default flight feeling.
Budva Standard photo 12 A practical Budva Standard visual: broad coast, simple route context, and the default flight feeling.
Budva Standard photo 13 A practical Budva Standard visual: broad coast, simple route context, and the default flight feeling.
Budva Standard photo 14 A practical Budva Standard visual: broad coast, simple route context, and the default flight feeling.
Budva Standard photo 15 A practical Budva Standard visual: broad coast, simple route context, and the default flight feeling.
Budva Standard photo 16 A practical Budva Standard visual: broad coast, simple route context, and the default flight feeling.
Budva Standard photo 17 A practical Budva Standard visual: broad coast, simple route context, and the default flight feeling.
Budva Standard photo 18 A practical Budva Standard visual: broad coast, simple route context, and the default flight feeling.
Budva Standard photo 19 A practical Budva Standard visual: broad coast, simple route context, and the default flight feeling.
Budva Standard photo 20 A practical Budva Standard visual: broad coast, simple route context, and the default flight feeling.
Budva Standard photo 21 A practical Budva Standard visual: broad coast, simple route context, and the default flight feeling.
Budva Standard photo 22 A practical Budva Standard visual: broad coast, simple route context, and the default flight feeling.
Budva Standard photo 23 A practical Budva Standard visual: broad coast, simple route context, and the default flight feeling.
Budva Standard photo 24 A practical Budva Standard visual: broad coast, simple route context, and the default flight feeling.
Budva Standard photo 25 A practical Budva Standard visual: broad coast, simple route context, and the default flight feeling.
Budva Standard photo 26 A practical Budva Standard visual: broad coast, simple route context, and the default flight feeling.
Budva Standard photo 27 A practical Budva Standard visual: broad coast, simple route context, and the default flight feeling.
Budva Standard photo 28 A practical Budva Standard visual: broad coast, simple route context, and the default flight feeling.
Budva Standard photo 29 A practical Budva Standard visual: broad coast, simple route context, and the default flight feeling.
Budva Standard photo 30 A practical Budva Standard visual: broad coast, simple route context, and the default flight feeling.
Budva Standard photo 31 A practical Budva Standard visual: broad coast, simple route context, and the default flight feeling.
Budva Standard photo 32 A practical Budva Standard visual: broad coast, simple route context, and the default flight feeling.
Budva Standard photo 33 A practical Budva Standard visual: broad coast, simple route context, and the default flight feeling.
Budva Standard photo 34 A practical Budva Standard visual: broad coast, simple route context, and the default flight feeling.
Budva Standard photo 35 A practical Budva Standard visual: broad coast, simple route context, and the default flight feeling.
Budva Standard photo 36 A practical Budva Standard visual: broad coast, simple route context, and the default flight feeling.
Budva Standard photo 37 A practical Budva Standard visual: broad coast, simple route context, and the default flight feeling.
Budva Standard photo 38 A practical Budva Standard visual: broad coast, simple route context, and the default flight feeling.
Budva Standard photo 39 A practical Budva Standard visual: broad coast, simple route context, and the default flight feeling.
Budva Standard photo 40 A practical Budva Standard visual: broad coast, simple route context, and the default flight feeling.
Budva Standard photo 41 A practical Budva Standard visual: broad coast, simple route context, and the default flight feeling.
Budva Standard photo 42 A practical Budva Standard visual: broad coast, simple route context, and the default flight feeling.
Budva Standard photo 43 A practical Budva Standard visual: broad coast, simple route context, and the default flight feeling.
Budva Standard photo 44 A practical Budva Standard visual: broad coast, simple route context, and the default flight feeling.
Budva Standard photo 45 A practical Budva Standard visual: broad coast, simple route context, and the default flight feeling.
Budva Standard photo 46 A practical Budva Standard visual: broad coast, simple route context, and the default flight feeling.
Budva Standard photo 47 A practical Budva Standard visual: broad coast, simple route context, and the default flight feeling.
Budva Standard photo 48 A practical Budva Standard visual: broad coast, simple route context, and the default flight feeling.
Budva Standard photo 49 A practical Budva Standard visual: broad coast, simple route context, and the default flight feeling.
Budva Standard photo 50 A practical Budva Standard visual: broad coast, simple route context, and the default flight feeling.
Sveti Stefan photo 1 Sveti Stefan route context: useful when the island view is the reason for a more specific route.
Sveti Stefan photo 2 Sveti Stefan route context: useful when the island view is the reason for a more specific route.
Sveti Stefan photo 3 Sveti Stefan route context: useful when the island view is the reason for a more specific route.
Sveti Stefan photo 4 Sveti Stefan route context: useful when the island view is the reason for a more specific route.
Sveti Stefan photo 5 Sveti Stefan route context: useful when the island view is the reason for a more specific route.
Sveti Stefan photo 6 Sveti Stefan route context: useful when the island view is the reason for a more specific route.
Sveti Stefan photo 7 Sveti Stefan route context: useful when the island view is the reason for a more specific route.
Sveti Stefan photo 8 Sveti Stefan route context: useful when the island view is the reason for a more specific route.
Sveti Stefan photo 9 Sveti Stefan route context: useful when the island view is the reason for a more specific route.
Sveti Stefan photo 10 Sveti Stefan route context: useful when the island view is the reason for a more specific route.
Sveti Stefan photo 11 Sveti Stefan route context: useful when the island view is the reason for a more specific route.
Sveti Stefan photo 12 Sveti Stefan route context: useful when the island view is the reason for a more specific route.
Sveti Stefan photo 13 Sveti Stefan route context: useful when the island view is the reason for a more specific route.
Sveti Stefan photo 14 Sveti Stefan route context: useful when the island view is the reason for a more specific route.
Sveti Stefan photo 15 Sveti Stefan route context: useful when the island view is the reason for a more specific route.
Sveti Stefan photo 16 Sveti Stefan route context: useful when the island view is the reason for a more specific route.
Sveti Stefan photo 17 Sveti Stefan route context: useful when the island view is the reason for a more specific route.
Sveti Stefan photo 18 Sveti Stefan route context: useful when the island view is the reason for a more specific route.
Sveti Stefan photo 19 Sveti Stefan route context: useful when the island view is the reason for a more specific route.
Sveti Stefan photo 20 Sveti Stefan route context: useful when the island view is the reason for a more specific route.
Sveti Stefan photo 21 Sveti Stefan route context: useful when the island view is the reason for a more specific route.
Sveti Stefan photo 22 Sveti Stefan route context: useful when the island view is the reason for a more specific route.
Sveti Stefan photo 23 Sveti Stefan route context: useful when the island view is the reason for a more specific route.
Sveti Stefan photo 24 Sveti Stefan route context: useful when the island view is the reason for a more specific route.
Sveti Stefan photo 25 Sveti Stefan route context: useful when the island view is the reason for a more specific route.
Sveti Stefan photo 26 Sveti Stefan route context: useful when the island view is the reason for a more specific route.
Sveti Stefan photo 27 Sveti Stefan route context: useful when the island view is the reason for a more specific route.
Sveti Stefan photo 28 Sveti Stefan route context: useful when the island view is the reason for a more specific route.
Takeoff context Takeoff context for understanding the start of the tandem flight.
Budva overview Budva overview context for the gallery support layer.

Keep the photo route practical

Use these images to compare the feel of Budva Standard, Riviera, Old Town, Sveti Stefan, takeoff, and landing context. If a visitor already knows which view matters most, send them back to the Budva route pages.

Next gallery route

Use video if you want movement and flight rhythm.

Photos help with route comparison. Videos help with motion, takeoff rhythm, and general flight feeling.

Watch video cardsCompare Budva routes

budva-paragliding.me

Budva tandem paragliding with clear route choices, simple next steps, and local detail where it matters.

Start Here

Budva Home Paragliding Options First Flight Gallery

Before You Book

FAQ Reviews Contact Us Gift Card

More Budva Answers

How paragliding fits a Budva stay What to expect from a Budva tandem flight What to do after paragliding in Budva Budva or Becici for paragliding?